
Renown Auto Restoration Blog
1967 Shelby GT 500
The 1967 Shelby GT 500. The perfect blend of sport and muscle, 1967 Shelby GT 500 was designed and built to satisfy a taste for high performance American cars. Carroll Shelby did what he did best, he designed a car that would scare even the most experienced driver. The 1967 GT 500 had a list of upgrades over the regular Mustang that included the reworked 428-cid V-8. Shelby added the cast-aluminum medium-rise intake from Fords 427 and twin 600-cfm Holley four-barrel carburetors to produce a conservative rating of 355bhp.
Shelby added numerous performance upgrades over the regular Mustangs as well as many cosmetic attributes that makes it stand out over the competition still today, just as it did 50 years ago.
Original base price in 1967: $4,195.00
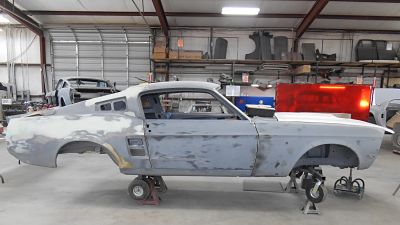
And here it is, the iconic 1967 Shelby GT 500. Now, I know what you are thinking… This picture doesn’t really capture the iconic styling and beauty that these cars are known for and I would agree. But, what it does capture is the reality of what a 50 year old car being restored looks like.

Now this car was in good shape when we got it. It had new panels where needed and some of the fitment had been done. What it was missing and what the owner wanted done was: body panel alignment and gapping, body work, primer, block sanding and paint. The owner of the car sat down with the owner of Renown Auto Restoration, Rudy Quinones, and formulated a plan to get this classic back to its original glory. Now, when we say “original”, we mean it. (Like, red oxide in the wheel wells… I’ll get to that a little later).
Even though this car came to the shop in better shape than some we have seen, it still needed plenty of body work. Our techs got to work aligning all the panels, gaping those panels and smoothing out each and every bump to give this car the razors edge it deserves.

After all the major body work was completed and everything was aligned and perfect, they took it all apart again. The disassembly and reassembly process is crucial and necessary to properly primer each and every panel in its entirety.

After primer, the entire vehicle, inside and out is sprayed with guide coat to ensure every inch of the car is block sanded to perfection. This is also when we begin our 2nd test fitting of lights, scoops, glass and accessories to ensure a proper fit and that nothing fits too tight now that a layer of primer is on the car.

After final primer and final sanding, the Shelby is ready for paint.
Remember the Red Oxide comment I made earlier, well here's what I was talking about. When A Mustang was painted from the factory, there were things that would happen that wouldn't normally happen in a restoration. One of them is over spray and Red Oxide Primer in the wheel wells. We meticulously poured over vintage color photos of factory Mustangs to get the look just right. Below you will see the red oxide and the color over spray in the wheel wells that would have been normal from the factory.


Before we begin the painting process as it pertains to the outside of the vehicle, first we paint the inside to include the jams, trunk and the entire interior. Below you can see the original factory color of Lime Gold Metallic that the Shelby will be painted.

After being painted with the factory Lime Gold Metallic, the measurements for the stripes were made and then painted on top of the base color.


You can see in the pictures above we taped off the sections for the stripes and painted the white on top of the green before putting four coats of clear on top.
Here is a quick video of our painters applying the final coat of clear.
Next we begin the wet-sanding process.
When you subscribe to the blog, we will send you an e-mail when there are new updates on the site so you wouldn't miss them.
About the author
Copyright © Renown Auto Restoration. All Rights Reserved. Website by The Ousset Agency